> ## Documentation Index
> Fetch the complete documentation index at: https://www.latentcast.com/docs/llms.txt
> Use this file to discover all available pages before exploring further.
# Brand kits and styles
> Your colours, fonts and logo, and the production style that decides how a story is paced and how much happens on screen.
**Where:** Look & feel ▸ Brand kits, and Look & feel ▸ Styles
Two settings decide how a story looks and feels. The brand kit makes it
yours: your colours, your fonts, your logo. The style decides its character:
calm and information-first, or fast and energetic. You choose both in the creation wizard, and you
can look after both from the sidebar.
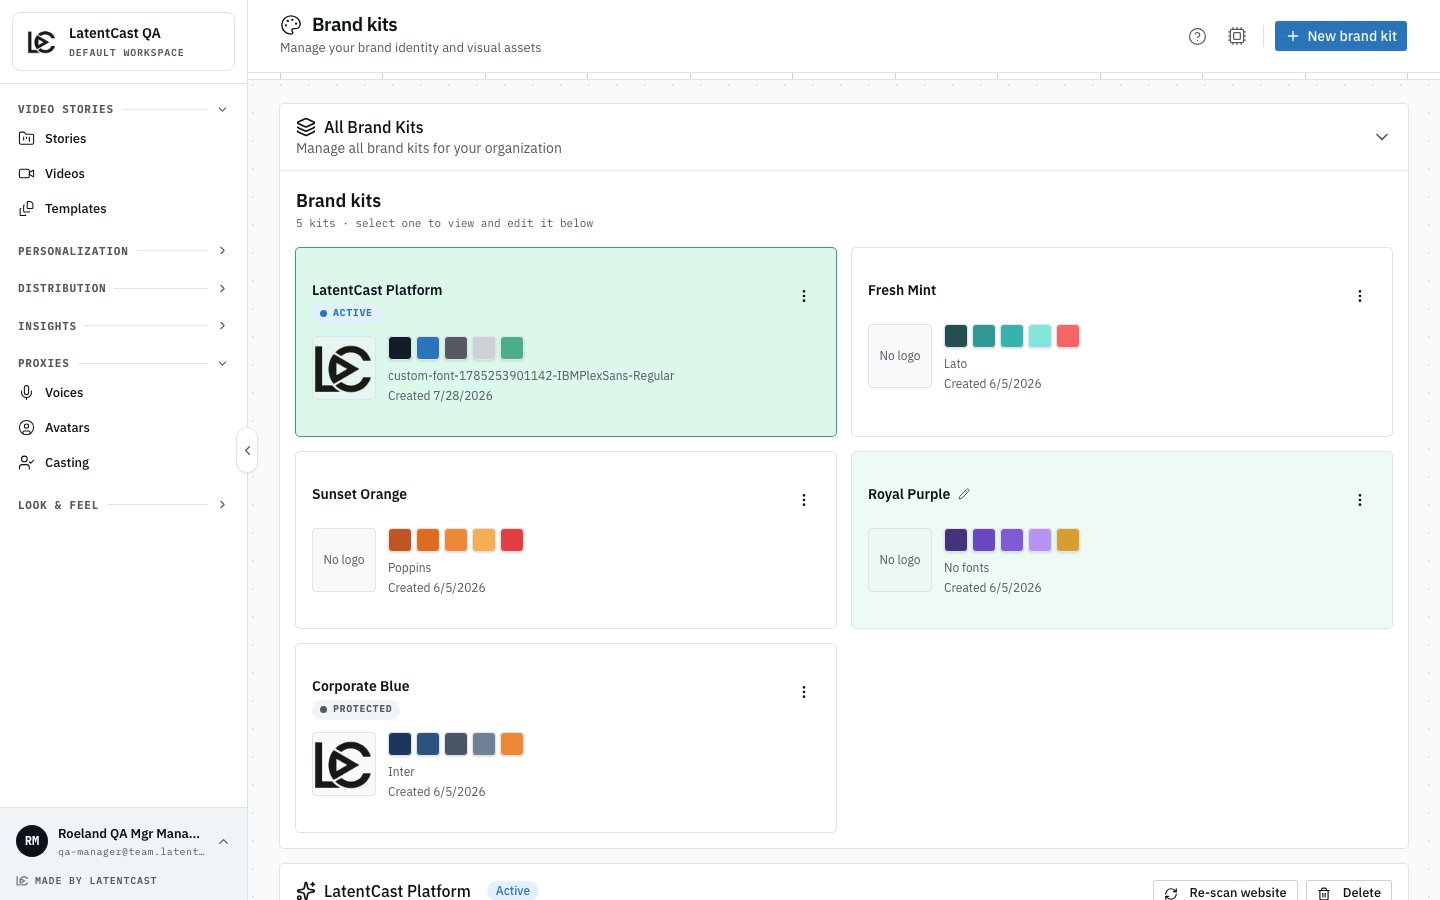
## Your brand kit
A kit holds:
* **Colours** — a primary, secondary and accent colour, plus the background and text colours.
* **Typography** — up to three fonts, with weights. You can also upload your own font files.
* **A logo** — used in on-screen overlays.
* **Brand personality** — a few words describing how your brand reads, found while scanning your
site and used to guide imagery.
### Making one from your website
The quickest way to a kit is to let LatentCast read your website. It pulls out your palette, your
typography and your logo, and takes a look at how your site presents itself.
On **Brand kits**, press **Create brand kit** the first time, or **Re-scan website** on a kit
you already have. The site it reads is your organization's website address, which is set on the
organization rather than here.
A card walks through reading your styles, finding the logo, capturing the site, analysing the
branding and saving the results. It usually takes under a minute, and you can leave the page and
come back.
A scan gets you most of the way. Fix the rest by hand: **Edit Colors** for the palette, **Edit**
for the fonts, and **Upload** for a cleaner logo than the one on your site.
**New brand kit does not scan anything.** The button at the top of the page makes an empty kit with
placeholder colours, for building by hand. The scan lives behind **Create brand kit** on an empty
organization, and **Re-scan website** on an existing kit.
### Re-scanning later
When your site is redesigned, **Re-scan website** offers two paths, and the difference matters:
| Choice | What happens |
| ------------------------------------ | --------------------------------------------------------------------------------------- |
| **Create a new brand kit** (default) | Your existing kit is untouched. The new one arrives switched off until you activate it. |
| **Replace this kit** | The open kit is overwritten. Colours, fonts and logo you set by hand are lost. |
Because the default creates rather than replaces, nothing appears to change until you set the new
kit as active.
### Several kits, one active
An organization can hold as many kits as it likes: one per brand, per product line, or a dated
snapshot of the site. Exactly one is **active**, and that is the one offered by default when you
create a story.
**Changing the active kit does not restyle existing stories.** A story keeps the kit it was created
with, so activating a new kit is safe mid-campaign. Editing the contents of a kit a story already
uses does reach that story.
 ## Styles
A style is the direction of the video rather than its content: how fast it is narrated, how much
motion there is, how much text appears on screen, where the presenter stands and how large they are,
and how much generated imagery the story may use.
Two styles are available today:
| Style | Character |
| ------------------- | -------------------------------------------------------------------------------------- |
| **Executive Brief** | Steady pacing, narrative clarity first. The safe choice for most business stories. |
| **Personal Touch** | Natural pacing built around the presenter, for when the person on screen is the point. |
Four more are visible and will become available later. They cannot be selected yet and are marked
as such in the wizard.
### Variants
A variant is your own copy of a style with your tweaks: "Executive Brief, but slower, and without
the b-roll". It belongs to your organization and leaves the original alone, which is what you want,
because the original is shared. Make one from the style's page, then pick it in the wizard exactly
as you would a style.
## Where you choose them
Both are chosen in **step 3 of the creation wizard**, and you can change them afterwards by
reopening the wizard on the story. Changing only the style rebuilds the visuals and leaves the
script alone.
## Next
Where the kit and the style are chosen.
What the style is actually shaping.
## Styles
A style is the direction of the video rather than its content: how fast it is narrated, how much
motion there is, how much text appears on screen, where the presenter stands and how large they are,
and how much generated imagery the story may use.
Two styles are available today:
| Style | Character |
| ------------------- | -------------------------------------------------------------------------------------- |
| **Executive Brief** | Steady pacing, narrative clarity first. The safe choice for most business stories. |
| **Personal Touch** | Natural pacing built around the presenter, for when the person on screen is the point. |
Four more are visible and will become available later. They cannot be selected yet and are marked
as such in the wizard.
### Variants
A variant is your own copy of a style with your tweaks: "Executive Brief, but slower, and without
the b-roll". It belongs to your organization and leaves the original alone, which is what you want,
because the original is shared. Make one from the style's page, then pick it in the wizard exactly
as you would a style.
## Where you choose them
Both are chosen in **step 3 of the creation wizard**, and you can change them afterwards by
reopening the wizard on the story. Changing only the style rebuilds the visuals and leaves the
script alone.
## Next
Where the kit and the style are chosen.
What the style is actually shaping.